Table 1
Overview of the observation instrument
| Criterion or dimension | Codes and categories | ||
| Reason for beginning the sequence | IMP: retaining possession; IR: recovering the ball; IFTD: direct free kick for the observed team; IFTI: indirect free kick for the observed team; IFJ: offside free kick for the observed team; ISC: kick-off for the observed team; ISB: throw-in for the observed team; ISE: corner kick for the observed team; ISP: goal kick for the observed team. | ||
| Consequence of the sequence | CSP: Retaining possession. CIR: Interception by rival – loss of possession. Interruption for the observed team: For/Inside, CAFD; For/Outside, CAFF. Interruption against the observed team: Against/Inside, CCD; Against/Outside, CCF. CGF: Scores goal. | ||
| Scoreboard | EM: drawing; W: winning; L: losing. | ||
| Zone of the pitch where the action is performed | Own half: safety sector (Z10, Z20, Z30); own half creation sector (Z40, Z50, Z60). Opponents’ half: opponents’ half creation sector (Z41, Z51, Z61); definition sector (Z70, Z80, Z90). | 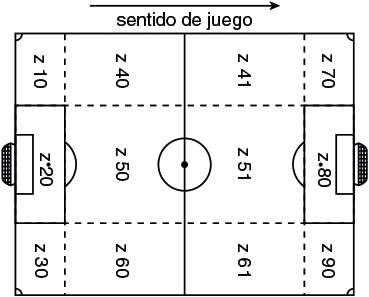 | |
| Context of interaction | Ball in the possession of the observed team: RMO: the back line has the ball in front of the middle line of the opposing team. RAO: the back line has the ball in front of the forward line of the opposing team. MRO: the middle line has the ball in front of the back line of the opposing team. MMO: the middle line has the ball in front of the middle line of the opposing team. MAO: the middle line has the ball in front of the forward line of the opposing team. ARO: the forward line has the ball in front of the back line of the opposing team. AMO: the forward line has the ball in front of the middle line of the opposing team. GO: the goalkeeper of the observed team has the ball. Ball in the possession of the opposing team: RMR: the back line has the ball in front of the middle line of the observed team. RAR: the back line has the ball in front of the forward line of the observed team. MRR: the middle line has the ball in front of the back line of the observed team. MMR: the middle line has the ball in front of the middle line of the observed team. MAR: the middle line has the ball in front of the forward line of the observed team. ARR: the forward line has the ball in front of the back line of the observed team. AMR: the forward line has the ball in front of the middle line of the observed team. GR: the goalkeeper of the opposing team has the ball. | ||
| Phase | IAP: start prior technical/tactical action; FAP: end prior technical/tactical action; ICJ: start control; FCJ: end control; IAVJ: start technical/tactical action linked to the control by the observed player; FAVJ: end technical/ tactical action linked to the control by the observed player; IAJT: start technical/tactical action by the player who intervenes after the observed player; FAJT: end technical/tactical action by the player who intervenes after the observed player. | ||
| Technical/tactical action | C: control of the ball; T: shot; CP: control plus pass; CM: control plus running with the ball and/or dribbling; CMP: control, running with the ball and/or dribbling plus pass; CB: header; IOC: occasional interruption with continuity. | ||
| Control contact surface | PL: sole of the foot; IN: inside of the foot; EX: outside of the foot; TA: heel of the foot; EMP: instep of the foot; OT: parts of the body other than the foot: chest, thigh, etc. | ||
| Incoming ball positioning in the control | BEAD: front-right quadrant; BEAI: front-left quadrant; BETD: rear-right quadrant; BETI: rear-left quadrant. | ||
| Outgoing ball positioning in the control | BSAD: front-right quadrant; BSAI: front-left quadrant; BSTD: rear-right quadrant; BSTI: rear-left quadrant. | ||
| Player positioning when controlling incoming ball | JEAD: front-right quadrant; JEAI: front-left quadrant; JETD: rear-right quadrant; JETI: rear-left quadrant. | ||
| Player positioning after controlling and playing the ball | JEAD: front-right quadrant; JEAI: front-left quadrant; JETD: rear-right quadrant; JETI: rear-left quadrant. | ||
| Opponents in the centre of play | S: centre of play unoccupied; C: centre of play congested; SO1: sector occupied 1; SO2: sector occupied 2; SO3: sector occupied 3; SO4: sector occupied 4; SO12: sectors occupied 1 and 2; SO13: sectors occupied 1 and 3; SO14: sectors occupied 1 and 4; SO23: sectors occupied 2 and 3; SO24: sectors occupied 2 and 4; SO34. sectors occupied 3 and 4; SL1: sector unoccupied 1; SL2: sector unoccupied 2; SL3: sector unoccupied 3; SL4: sector unoccupied 4. | ||


